One Handicraft, Two Ways: Painted Constellation Hoops
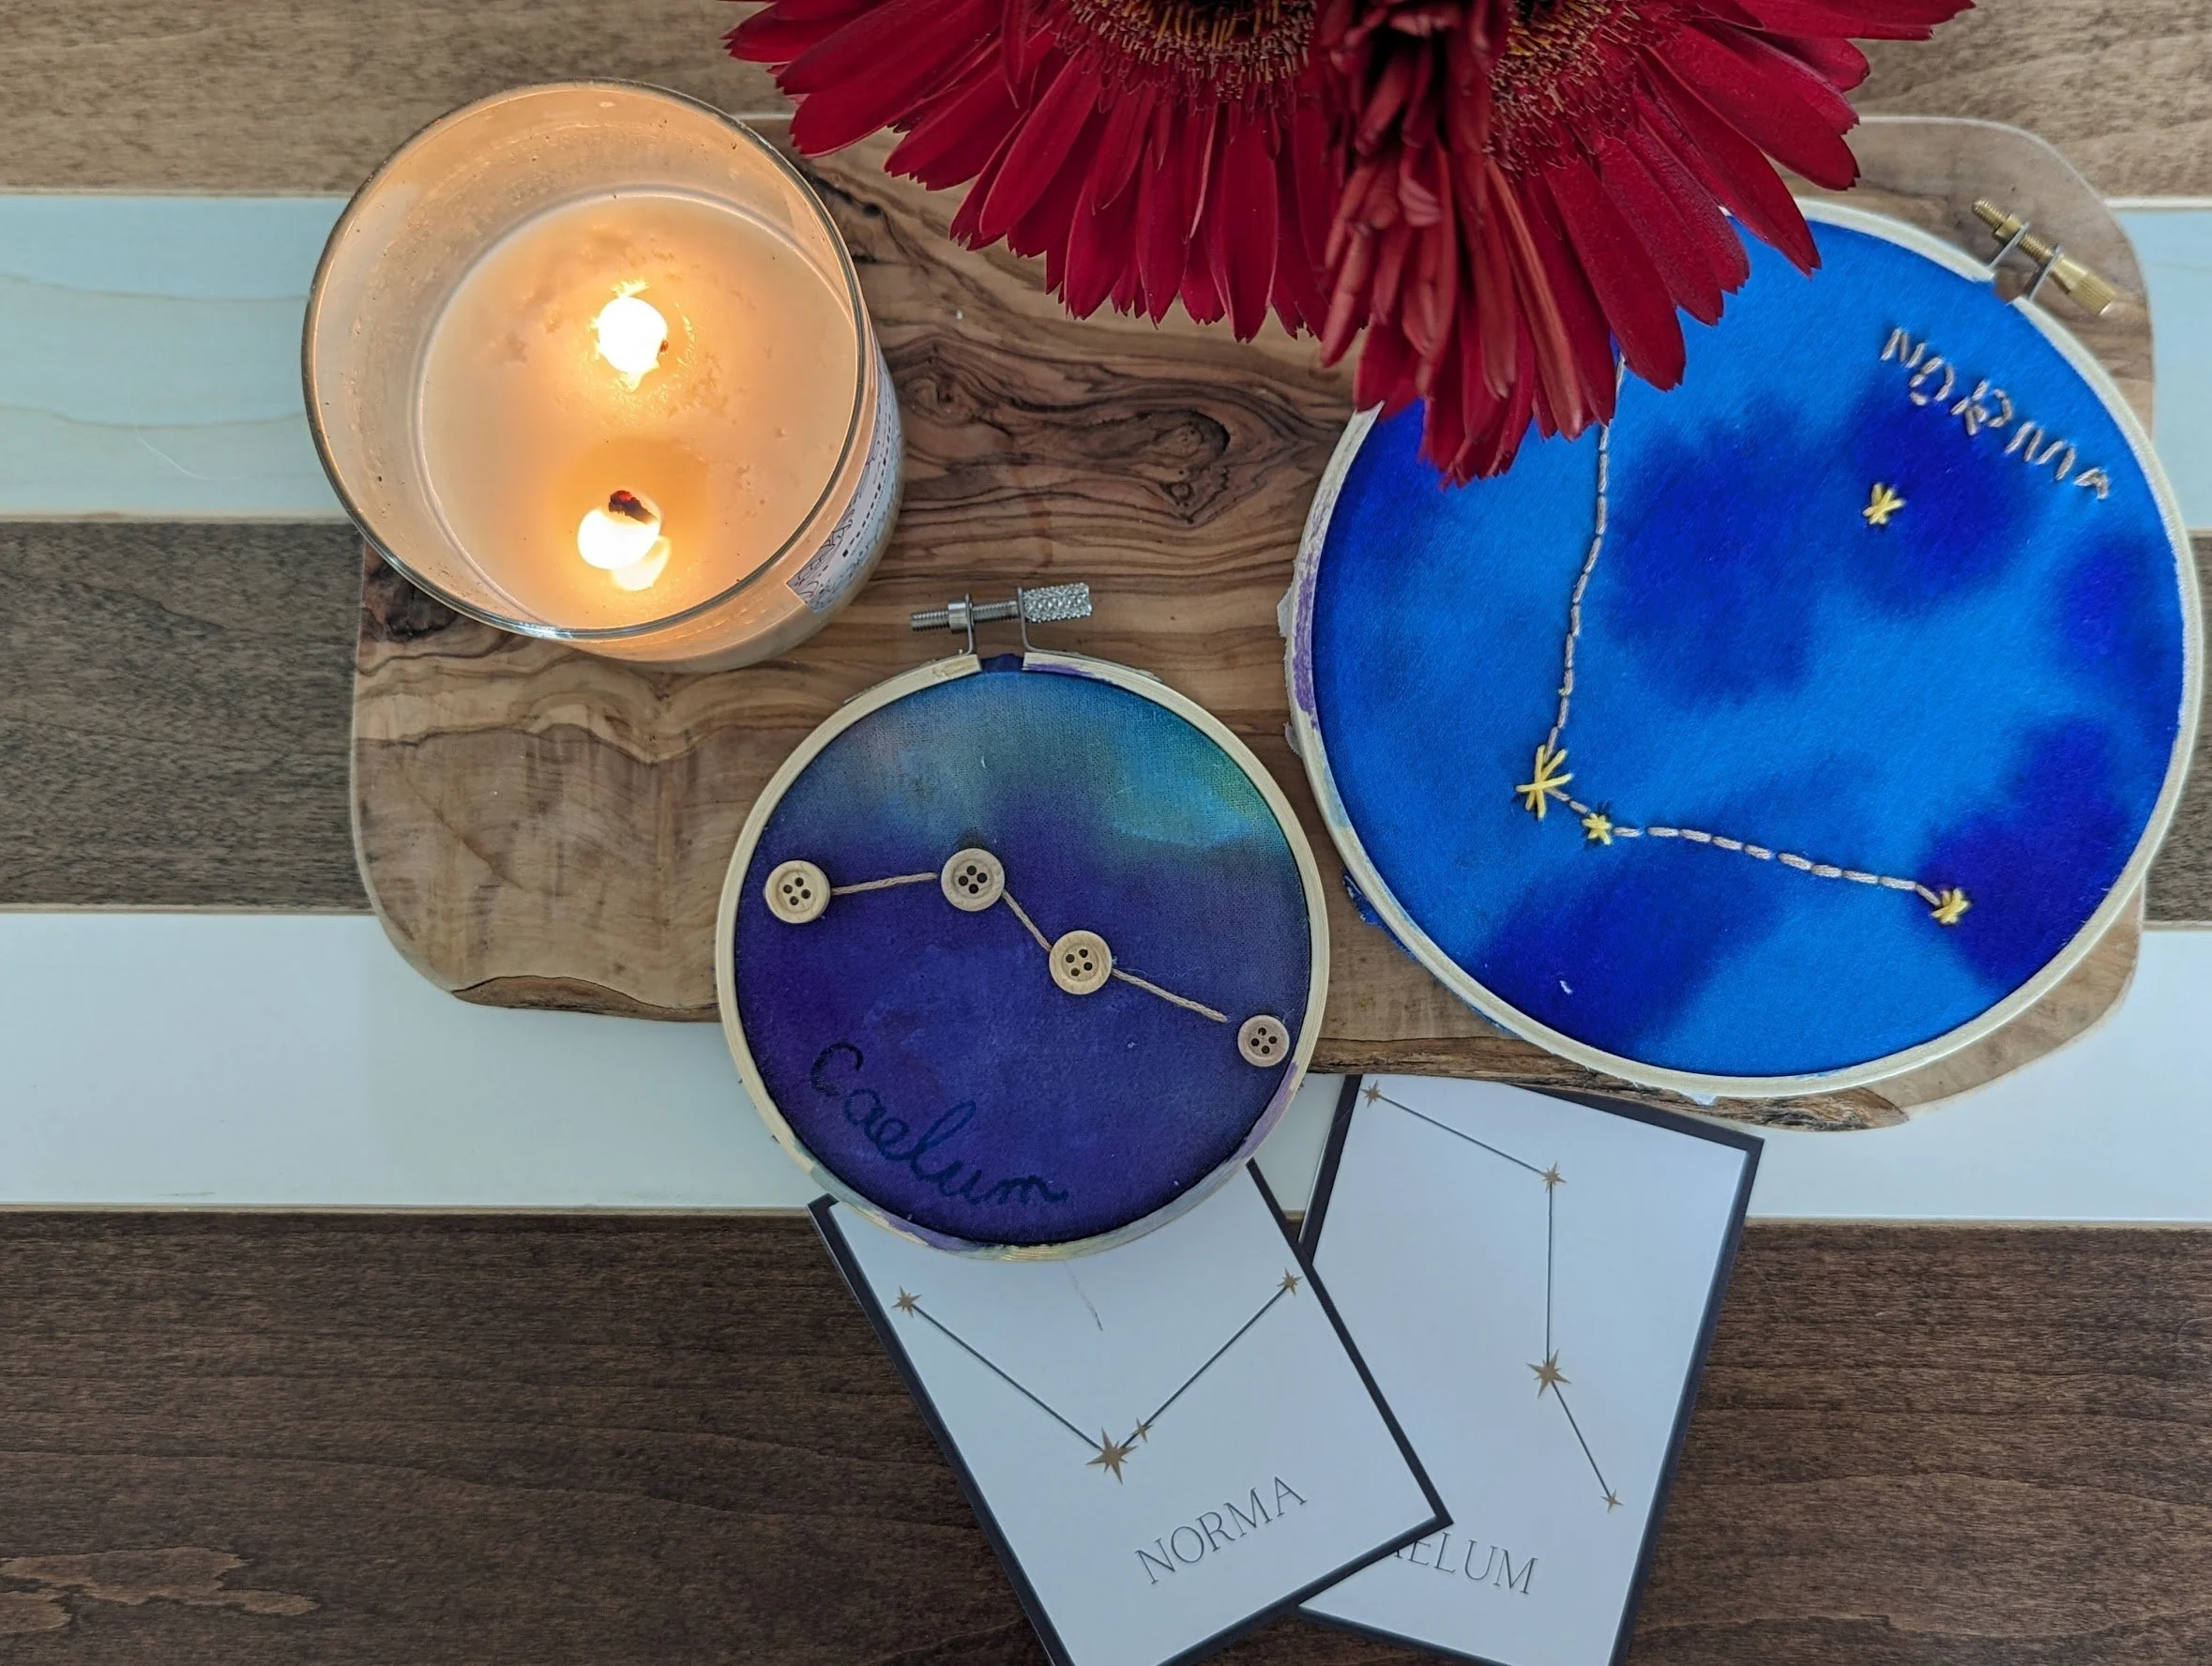
If you homeschool more than one child, you have probably stood at the kitchen table holding a handicraft plan and wondered how on earth it will work for both the child who can thread a needle and the child who is still learning to hold scissors well. A couple years ago we found an answer in a pair of painted constellation hoops, and I want to share how one simple handicraft opened itself up to two children of very different ages and abilities without asking me to plan two separate projects.
The Handicraft: A Night Sky in a Hoop
Both children began in exactly the same place, which is part of what made this so easy to bring to the table, there isn’t a different supply list for each child and incredible adaptations. Each child stretched a piece of plain cotton fabric in an embroidery hoop and painted it with watercolor, letting deep blues, violets, and touches of black bleed into one another until the fabric looked like a night sky at the edge of dusk. Watercolor behaves beautifully on fabric because the color travels along the weave and blooms in soft, uneven ways, so even a young child's brushwork ends up looking rich and atmospheric once it dries.
Once the painted skies were dry, each child chose a constellation, studied its shape on a small reference card, and then placed the stars onto the fabric in their true positions. This is where the two versions of the project went their separate ways, and where each child got to do work that was challenging and satisfying for them.
The Older Child's Way: Stitching the Stars
My older child sewed the constellation directly into the painted fabric with gold thread, marking each star with a small cluster of stitches and then joining the stars with a long running line so the shape of the constellation could be traced across the sky. The name of the constellation went onto the hoop as well, which gave the finished piece the feeling of an old star chart. Sewing through painted fabric asks for a steady hand and real attention, because every stitch has to land in the right place for the constellation to look true, and an older child feels the satisfaction of that precision in a way that makes the effort worthwhile.
The yellow thread against the deep blue is the detail I love most, because the stars catch the light from the candle on our table and shimmer a little when you walk past, and that shimmer belongs entirely to the care that went into each stitch.
The Younger Child's Way: Buttons for Stars
My younger child glued small wooden buttons onto the painted fabric to mark each star, matching their placement against the reference card with the same seriousness the older child. A button is wonderfully suited to small hands because it is easy to pick up, easy to position, and forgiving if it needs to be nudged a little before the glue sets, while still asking the child to look carefully at where each star belongs in relation to the others.
What delights me about the button hoop is how fully it belongs to the younger child. The finished piece is bold and tactile and unmistakably a constellation, and when it sits beside the stitched hoop on our table, it holds its own as a thing made with care and attention by a child who did work that was right for their hands this year.
Why This Fits a Charlotte Mason Handicraft
In Home Education, Charlotte Mason gives four points to keep in mind when choosing handicrafts for children:
"The points to be borne in mind in children's handicrafts are: (a) that they should not be employed in making futilities such as pea and stick work, paper mats, and the like; (b) that they should be taught slowly and carefully what they are to do; (c) that slipshod work should not be allowed; (d) and that, therefore, the children's work should be kept well within their compass." (Home Education, p. 315)
That last point is the one that makes a two-way handicraft like this one so freeing for a mother teaching several ages at once. Keeping the work within each child's compass means the younger child is given a task they can do well and carefully, and the older child is given a task that stretches them without frustrating them, so both children can be held to the standard of good work that Mason cared so much about. The buttons let the younger child place each star with real care using materials that suit their hands this year, and the stitching gives the older child a worthy challenge they can meet with patience.
The hoops also answer her concern about futilities. The hoops are lovely enough to keep and display, and they carry real knowledge with them. A child who has painted the sky, studied the arrangement of the stars, and placed each one by hand will look up on a clear autumn night and recognize that shape with the delight of an old friend, which is exactly the kind of living connection between hand, eye, and the created world that a Charlotte Mason education hopes to foster.
Supply List and Instructions
Everything below can be gathered from a craft store or ordered online, and most of it will last through many more handicrafts after this one.
Supplies for Both Children
One wooden embroidery hoop per child, in a 6 to 8 inch size, which is large enough to hold a full constellation and small enough for a child to manage comfortably.
Plain white or cream cotton fabric, such as muslin or quilting cotton, cut about 3 inches larger than the hoop on every side so there is plenty to grip when tightening.
Liquid watercolor paints in deep blues, violets, and a touch of black or indigo, along with a soft round brush in a medium size.
A small cup of water, a spray bottle for misting the fabric, and an old towel or a stack of paper towels to set beneath the hoop while painting.
A pinch of coarse salt, which is optional but lovely, since sprinkling it on wet paint draws the color into small starry speckles as it dries.
A printed or hand-drawn reference card for each constellation, showing the stars and the lines that connect them.
A sharp pencil for lightly marking where each star will go.
Supplies for the Stitched Hoop
An embroidery needle with a large eye, such as a size 5 or a chenille needle, which makes threading metallic floss much easier.
Gold metallic embroidery floss, which can be slippery and prone to tangling, so it helps to cut it into lengths of 12 to 18 inches.
Small scissors for snipping thread.
Supplies for the Button Hoop
A handful of small flat buttons in gold, silver, or cream, ideally in two or three sizes so brighter stars can be marked with larger buttons.
A tacky craft glue or fabric glue that dries clear, along with a toothpick for dabbing a small amount beneath each button.
Painting the Night Sky
Loosen the screw on the hoop, lay the fabric over the inner ring, press the outer ring down over it, and then tighten the screw while gently pulling the edges of the fabric until the surface is smooth and taut like a drum.
Set the hoop on the towel and mist the fabric lightly with water so the paint will spread and blend once it touches the surface.
Paint the fabric with the darker colors first, letting the blues and violets run into each other and leaving a few lighter patches so the sky has depth and movement.
Sprinkle a few grains of salt over the wet paint if you are using it, and then let the hoop dry completely, which usually takes an hour or two, before brushing the salt away.
Placing the Stars
Look at the reference card together and talk about the shape of the constellation, noticing which stars are brightest and how far apart they sit, so the child has a clear picture of it before marking anything.
Have the child mark each star with a light pencil dot, checking the card as they go, and then step back to look at the whole shape before committing to it.
Stitching the Constellation (Older Child)
Thread the needle with a length of gold floss and knot the end, then bring the needle up from the back of the fabric at the first star.
Make each star with a small cluster of stitches, such as a simple star stitch made from a cross with a plus sign over it, or a French knot for a smaller star.
Join the stars with a backstitch in gold thread, which gives a smooth and continuous line that traces the shape of the constellation clearly.
Add the name of the constellation along the edge of the sky if the child would like, either stitched in backstitch or written in gold paint pen.
Knot the thread securely on the back of the hoop each time a length runs out, and start a fresh length rather than pulling a worn piece of metallic floss through again.
Gluing the Constellation (Younger Child)
Dab a small amount of glue onto a pencil mark with the toothpick and press a button gently into place, holding it for a few seconds while the glue grips.
Work from one end of the constellation to the other, checking the reference card after each button so the shape stays true.
Draw or paint the connecting lines between the buttons with a gold paint pen if the child would like the constellation to read as a shape, and then leave the hoop to dry flat overnight.
Optional: Allow the smaller child to sew the buttons if they are able.
Finishing the Hoops
Turn the hoop over and trim the extra fabric to about an inch beyond the inner ring, then fold it toward the center and secure it with a line of glue or a quick running stitch gathered tight.
Hang the finished hoops by the screw at the top, or set them on a table or shelf beside the reference cards so the children can return to them and name their stars.
If you have a child somewhere in between, a middle path works beautifully too, such as gluing the buttons and then stitching the connecting lines, so this one handicraft can grow with each child from year to year.
One Sky, Two Children
There is something lovely about two children working side by side under the same painted sky, each one doing work that fits their hands and asks for their best attention, and each one finishing with something they are proud to set on the table. A handicraft offered this way lets a mother gather her children around one good idea and trust that it can meet each of them generously, and I hope it gives you the confidence to try it in your own home this autumn, perhaps on an evening when the stars are out and you can carry the hoops outside to find the real constellations overhead.